How to Carve Rubber Stamps

Buying stamps at an art store is expensive. Unless you are a hunter of yard sales, discount racks. or have really giving friends around holidays, stamping can lead to bankruptcy. After I got fed up with stamp prices, I began learning how to carve my own. It is a very fun and rewarding hobby, and can even be profitable (I run an Etsy shop). So how do you make a scrapbooking collection with personalized touches? Here are the major steps to take to carve stamps:
You may have noticed that the stamps you buy from the store usually have a wooden block attached. While nice for display and the like, as well as ease of printing, it is not necessary. I tend not to attach blocks to my creations, as it makes them harder to store and that much more expensive to make. Online, I have had a much easier time selling my non-mounted products than selling my mounted carved stamps.

1. Rubber
You have to go find some rubber sheets. Some people go to hardware stores and get heavy grade materials, but they are tough to carve in many cases, and the financial savings are usually minimal. I recommend buying the Speedball Speedy-Carve sheets if this is your first stamp carving adventure (find them online or at Michael's). It is soft and flexible, and it is easy to pierce and guide tools through. They also sell a Stamp Making Kit, and it comes with a few basic tools to carve (at a nice discount). There are other brands of rubber sheet, but Speedball has worked best for me when carving stamps.
Some people also use the pink, rubber erasers. While it is nice if you want to carve a few, small stamps, it will not work to carve a larger stamp (for obvious reasons). If it is simple lettering, then don't be afraid to find a pack of pink, rubber erasers for stamp carving!
2. Carving Tools
If you bought the Stamp Carving Kit, this is a little useless to you. Not entirely useless, as there are still a few important pieces! Any artist needs tools to carve into the rubber. Some people find household solutions, but the easiest choice is to pick a few small, cheap tools at first. There are the V and U shaped tools which are basic carving starters. I also suggest a type of knife (I use X-Acto) to cut the carved stamp out of the rubber sheet.
3. Drawing Tools/Design
The easiest way for a beginning artist/carver to get a nice layout for stamps is to get the right drawing materials. The first step, however, is to find a carve design. I use old pictures from vintage schoolbooks, I trace photographs lightly and even draw my own now. It is up to you what you want your first carved stamp to look like. That is the beauty of self carving stamps!

Once you have your carve design, you need to trace it on the tracing paper with a #2 pencil. This does two important things. It flips the image (because remember, a stamp has to be a mirror image: It flips when you flip it!) and, secondly, it makes the carve design immediately transferable to the rubber and easier to carve. So this means you should find some tracing paper and a pencil, and with that you have all of your supplies (beside ink for future stamping!
4. Begin!
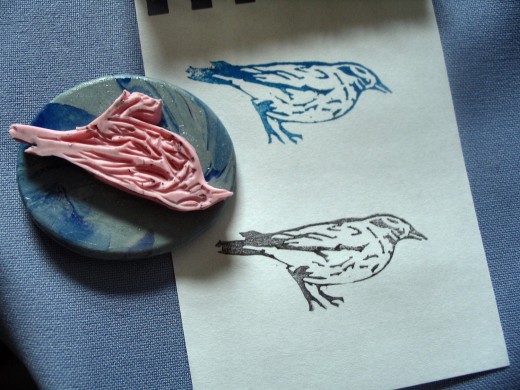
It starts, again, with the carve design you chose. I first chose a photograph of a bird. I traced it with pencil and tracing paper until it came out how I wanted it. After you are satisfied with the image on the tracing paper (this will be similar to your finished carved stamp if everything goes accordingly), bring the rubber sheet into the mixture. Take the side of the tracing paper you drew on, and press it against the surface of the rubber flatly and without sliding. Imagine the graphite is like an ink you are stamping! Press down. I like to take the eraser from my pencil and rub it over the tracing paper for pressure, like applying a temporary tattoo.
Once the carve design image is thoroughly transferred, and you are satisfied with the design, begin carving. This will be the hardest step (I always feeling guilty cutting into an untouched sheet). Remember, do not touch the pencil graphite (if you can help it) with your hands. It will rub and smudge, causing the image to distort as you are working, making the whole thing that much more difficult to carve.
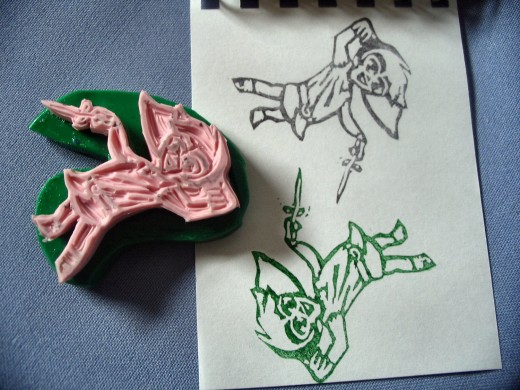
Some artists take the X-Acto knife and immediately cut out an area around the carve design. I don't like to do that, because the weight of the rubber makes it easier for me, but it is something each stamp artist decides for herself with carving practice. Once you are ready to carve, take whatever tools you have acquired (I like to start with the U), and then you can start cutting out the NEGATIVE space. That means, unlike tracing, you aim for everything that isn't the graphite drawing. By sight, looking at the stamp above, you can see the image that inks and stamps is protruding.
This will be difficult, and for most people it takes a little while to get down the feeling of guiding the carve tools through rubber. Don't be disappointed if you make mistakes at first when carving stamps.

When I feel close to finishing a stamp carve, I like to test my stamps. Get a handy ink pad.
Use the carved stamp like you would any other stamp. Coat it evenly with ink, apply it to paper with equal pressure, and see how the carved stamp comes out. You may notice some little odd areas, or that maybe a few lines are crooked and thick. Take your stamp, rinse it clean and fix the problem areas! I will do this 5-10 times before I finish the average stamp carve.
When you're finished and satisfied with your carved stamp... well congratulations! You are now the proud owner of a hand-crafted, one of a kind carved stamp AND the ability to make as many more as you wish! Happy stamping!


